In the world of rubber stamping and card making, just like in every craft or hobby out there, there are always new things to buy. In my corner of the crafting world, not only are there always new stamps, inks, embossing folders, etc., (and yes, I have a few new things to show all two of you who read this blog), there are also bigger ticket items: machines or tools of one kind or another for embossing, die cutting, and now duplicate and precision stamping. To quote the introductory video, meet MISTI...
When I'm making a card and I need the stamped image to go in a particular place, I use a stamp positioner. Mine is like this one from Apple Pie Memories. I fit the acrylic sheet into the corner, and stamp. This establishes the relationship of the stamp to the corner. I can use the plate to place the image on my card, and then stamp confidently knowing exactly where my image will land (as long as nothing moves...). This system is great and pretty easy to use, and one I'll probably always use with wood-mounted stamps. But I started reading about this tool that helps you position stamps accurately and more easily create multiples when you are using clear or cling stamps.
MISTI is an acronym for the Most Incredible Stamp Tool Invented. It's really an simple system.
It's a clear acrylic box with laser-etched grid lines on the top, and similar grids on the metallic bottom, with a hinged lid. Your paper sits in the box, secured by magnets. Your stamps adhere to the inside of the box lid. Close the box, and voila!
The tool comes with a removable foam pad so it can be used with both thinner clear stamps as well as foam-backed cling stamps. The theory is that once you've made your design, you can always align your stamps and paper for easy re-stamping. I've only played with it once, but here are some things MISTI does very well shown with my little-used Spellbinders/Hampton Arts Royal Affair stamp and die set.
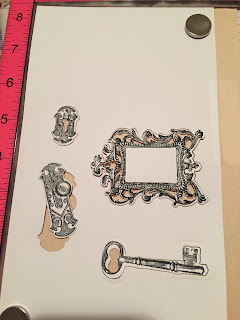
I first die cut the shapes
And then by laying the un-inked stamp on top of the die cut, closing the lid, inking the stamps, which cling to the lid, and closing the box, I got a near perfect match of stamp to shape.
It's hard to see in the picture above, but the ornate frame didn't stamp well the first time. I had missed inking some of the rubber. This is also one of the benefits of MISTI - you get a second chance. Because the stamp is adhered to the box lid, and the paper held in place with magnets, you will stamp in the same place the second time without any ghosting. You can see in the picture below that I was able to rescue my frame and get it properly inked the second time.
The stamp set comes with images that you can put in your frame. So I aligned the uninked image on the frame, opened the box lid, inked, and stamped.
You can see below that my alignment isn't 100% perfect, but it's pretty close. I was able to stamp this single die-cut layer with two colors and no tears.
There are tons of other things you can do with MISTI - I'm only scratching the surface. Youtube videos abound. It may not be the tool I use every time because most of my stamps are wood-mounted, which I prefer, but I may make me more inclined to use unmounted stamps, and possibly even convert some of my mounted stamps to clings.
I'm using MISTI for my holiday cards. I'll report back...


No comments:
Post a Comment