In the world of rubber stamping and card making, just like in every craft or hobby out there, there are always new things to buy. In my corner of the crafting world, not only are there always new stamps, inks, embossing folders, etc., (and yes, I have a few new things to show all two of you who read this blog), there are also bigger ticket items: machines or tools of one kind or another for embossing, die cutting, and now duplicate and precision stamping. To quote the introductory video, meet MISTI...
When I'm making a card and I need the stamped image to go in a particular place, I use a stamp positioner. Mine is like this one from Apple Pie Memories. I fit the acrylic sheet into the corner, and stamp. This establishes the relationship of the stamp to the corner. I can use the plate to place the image on my card, and then stamp confidently knowing exactly where my image will land (as long as nothing moves...). This system is great and pretty easy to use, and one I'll probably always use with wood-mounted stamps. But I started reading about this tool that helps you position stamps accurately and more easily create multiples when you are using clear or cling stamps.
MISTI is an acronym for the Most Incredible Stamp Tool Invented. It's really an simple system.
It's a clear acrylic box with laser-etched grid lines on the top, and similar grids on the metallic bottom, with a hinged lid. Your paper sits in the box, secured by magnets. Your stamps adhere to the inside of the box lid. Close the box, and voila!
The tool comes with a removable foam pad so it can be used with both thinner clear stamps as well as foam-backed cling stamps. The theory is that once you've made your design, you can always align your stamps and paper for easy re-stamping. I've only played with it once, but here are some things MISTI does very well shown with my little-used Spellbinders/Hampton Arts Royal Affair stamp and die set.
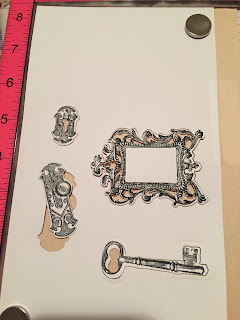
I first die cut the shapes
And then by laying the un-inked stamp on top of the die cut, closing the lid, inking the stamps, which cling to the lid, and closing the box, I got a near perfect match of stamp to shape.
It's hard to see in the picture above, but the ornate frame didn't stamp well the first time. I had missed inking some of the rubber. This is also one of the benefits of MISTI - you get a second chance. Because the stamp is adhered to the box lid, and the paper held in place with magnets, you will stamp in the same place the second time without any ghosting. You can see in the picture below that I was able to rescue my frame and get it properly inked the second time.
The stamp set comes with images that you can put in your frame. So I aligned the uninked image on the frame, opened the box lid, inked, and stamped.
You can see below that my alignment isn't 100% perfect, but it's pretty close. I was able to stamp this single die-cut layer with two colors and no tears.
There are tons of other things you can do with MISTI - I'm only scratching the surface. Youtube videos abound. It may not be the tool I use every time because most of my stamps are wood-mounted, which I prefer, but I may make me more inclined to use unmounted stamps, and possibly even convert some of my mounted stamps to clings.
I'm using MISTI for my holiday cards. I'll report back...
Wednesday, December 16, 2015
Wednesday, December 9, 2015
After the constant hum of activity of the last few weeks, I finally got a chance to spend time in my craft room and make some stuff. I haven't started on my big holiday card-making blitz, but I needed a couple of Chanukah cards immediately, and with that as my goal, I got to work.
Tasks like this, where I feel like I'm starting from nothing, often overwhelm me. But this time I kept moving forward aided by the fact that I don't actually have very many Jewish-themed stamps, and I have a pile of inspiration cards saved in Evernote and Pinterest. The card that grabbed my attention last night was this one by Heather Nichols of Pine is Here:
Heather uses the emboss resist technique which is simply stamping an image, embossing it with embossing powder and a heat tool, inking over it, and wiping away the ink from your stamped image. Because embossing powder, once melted, is magical, the ink won't stick to its plastic-y surface.
I've long loved the cards people create with this technique, but as I don't really have good, sticky ink or good heat embossing skills, I have shied away from it. But I have new power outlets in my craft room, a neglected heat tool, and a ton of embossing powder, so I thought I'd give it a go.
I chose these stamps: Star by PSX; Sentiment by Stampinks, Unlimited (both companies now out of business!)
I wanted a simple design - something like this, but not crooked...
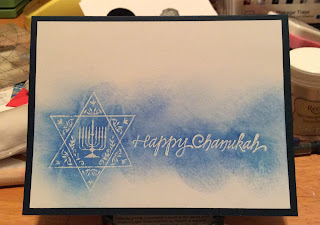
I stamped the image and the sentiment with white pigment ink, and embossed with white embossing powder. I inked over both in blue dye ink, and used a damp baby wipe to carefully wipe the blue ink off of the stamped images. The image below doesn't really capture how the white embossed bits popped, but they did!
Here's the final card, mounted on navy duplex card stock.
I definitely want to keep working on emboss resist. With practice and newer, stickier inks, this might become a quick and easy card-making technique for me.
What are you making this holiday season?
Friday, October 30, 2015
Copy cat...
In my last post I talked about getting inspiration from the creations of others and using them as a jumping off point for my own work. Or just plain copying them. Pinterest has made it easy to save images I find compelling: they use a stamp I own and love, it's a design that catches my eye that I think I could replicate, they embody an idea or a concept I want to try, etc. Once I started gathering the cards I had made and the source of the idea, I found there were an awful lot of them... Below are a bunch of comparisons, almost all from this year. My inspiration photo is on the left, and my version is on the right in all cases.
Inspired by this card from Jeanne Jachna, I made a card for my mom's birthday. This was so easy, yet so impressive. Hurrah for sticker paper, dye inks and glossy paper. Huge bang for the buck. The die cut is from Poppystamps.
Based on a card by Teresa Pham (which I think was posted somewhere here), I love the idea of using peg stamps, embossing folders and my embossing diffuser. I like the inspiration card more than mine, so I need to revisit this design and try some new versions. In fact, now that I look at the tow cards, I don't think the original used peg stamps at all, and that the bigger stamps help with the scale.
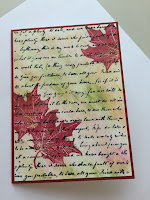
Cards with illegible word backgrounds! My favorite. I think my inspiration card uses an old book page or a pre-printed sheet for it's background. I know I did mine in a hurry, but if I try this one again, I want to incorporate more of the lights and darks used in the inspiration image.
I made this card just the other night based on a card by Emma Kirton. I already had the stamp out, which was a bonus, and again got a chance to play with incorporating dry embossed papers into my cards. Looking at the image now, I should have made my border at least the same width as my ribbon. My card's proportions are out of whack. I'm not really a ribbons/bows on my cards type of person, so I need to either adjust the balance of the elements with no ribbon, or embrace the idea of embellishments.
This is a card from last spring based on a design from NanaDiana. I followed the inspiration image fairly exactly although I used different stamps and a different embossing folder. One key difference which you can only see if you look up close is whether the main panel was embossed first and then stamped (sample), or stamped and then embossed (mine). If I use this design again, I'll try it the other way around to see if it looks different/better. I do like the way I accidentally framed the embossed flower.
I've featured these two cards on the blog before - inspiration image from Torrey Moseley, and still count this as one of my most successful experiments in duplication. For those of you interested in the progress of the fading dye ink, see the updates below from May and today, the end of October.
The formerly sunset sky is now full-on cloudy day, while the border of the sentiment still shows the remnants of the original color.
This image from Lin was immediately appealing because it looked simple to replicate and appeared to use peg stamps. I have lots of peg stamps which are under-utilized in my craft room. Looking at the two cards side-by-side, I prefer the amount of white space, the pops of color, and the scale of the image to the sentiment in the original. I definitely want to try this one again.
I work with die cuts only rarely. I'm a late adopter to them and only have a few (with many more on my shopping list). This card by Lisa is simple, which is appealing. When I try it again, I'll follow the sample more closely with the die cuts filling the frame.
And finally (you made it!!), my thank you cards from the last post inspired by an original from Shelly Starkis.
I have no doubt that I will continue to look to the work of others for inspiration. I appreciate the sentiment that I've read about in card-making blogs - it's not copying, it's flattery. And it truly is.
Wednesday, October 28, 2015
A set of thank-yous...
As I begin this post, I realize that I never finished talking about all of my new things. But as there are always new things, no doubt I will return to that topic by and by.
A couple of weeks ago I needed to make about 20 thank-you cards. As always, when I'm going into mass production mode, I try for something that's nice looking, simple, uses supplies I already have, and easy and fact to replicate. And, as always, I have mixed success with this.
I started by looking for ideas on my Card Ideas board on Pinterest. The image that grabbed me was this card by Shelly Starkis which uses a stamp from Stampin' Up (which now I want to acquire - hello, Ebay!).
I knew I had a stamp that was pretty close to the one in Shelly's card, so after looking through my stamp catalogue, here's what I pulled together:
The focal, vaguely organic image I settled on is from Magenta. The little Thank You is a new stamp by Endless Creations. I can't remember which of the two inks I chose. I suspect it was neither of these but a Marvy dye ink, probably in Plum (it being me and all...).
I tried several different iterations of the card before I got it to a version I was happy with. It's amazing how this concept of trying something many times before getting it right is new to me in the realm of rubber stamping. Rather than trying something once, having it look bad or iffy, getting frustrated for not getting it right the first time, feeling extremely uncreative, and then abandoning the project, I gave myself permission and time to have an iterative process. Of course, this only works when I have sufficient time to work on things, but still, progress...
In this first attempt, the image was too dense and too close to the penciled border, but I liked the scale of the sentiment and the frame.
This portrait version was better, but I really wanted to go for landscape with the cleaner image, lack of over-stamped shadow images, and the wider border.
This last attempt is just about there, but still a little to visually crowded at the bottom. I wanted more breathing room for the sentiment.
Here's a blurry version of the final card. I masked off the bottom of the floral image to create a crisp, straight line and leave some white space. I inked over the pencil border, leaving a gap for the sentiment.
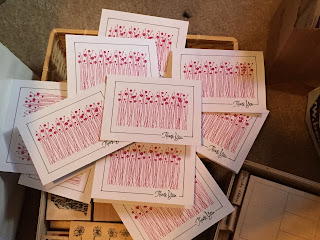
Here's the pile of finished cards! I love the simplicity of the image, even if it does lack the delicacy of the stamp used in my inspiration card.
I find it happening more and more that I take a card I find online and try to recreate it, or use it as a jumping off point for my own images. I definitely have a mixed success rate doing this, but it pushes me to try different things, and gets me out of the place where I have so many possibilities of cards to make and stamps to use that I fall back on organizing my products or working on my stamp drawer maps and make nothing new. In another post I'll round up some of my card inspirations with my versions.
What are you making these days?
Friday, October 2, 2015
So Many New Things - Part 3 - Stamps!
I was going to say that I vacillate between wanting many, many new stamps, and wanting to stop adding to my collection and figure out and use often the stamps I already own. This is, of course, not true. I always want new stamps. And even though I don't feel like I get around to craft stores which carry stamps on a regular basis very often, I made plenty of stamp purchases this spring and summer.
The bulk of my stamp purchases were at the Heirloom show last spring. I mentioned in my previous post that I spent the most money and time at the Impression Obsession booth. They have a line of stamps called "Cover-a-Card" that I can't get enough of. These are mostly 6" x 6" squares that serve as background stamps. Because of their size, they will cover the entirety of most cards with one stamping (I use A2 - 5-1/2" x 4-1/4" most frequently). These are cling stamps which means you have to use IO's fancy rocking stamp mount thing, another really big acrylic block, or, like me, your big 6" x 12" quilting ruler. They have a million designs. I had about 3 of them prior to the show. I bought 6. There are about 30 more I want!
These are Greenery, Gradation, Sunburst, Fluff, Rain, and Spatter.


The style of rubber stamps and rubber stamping that really resonated with me when I first started was called "art stamping." By my definition, this was in contrast with cute, cartoon-ish stamps and well-suited to collage, faux postage, and other themes I gravitated towards. It seems like most of the companies that made art stamps have either merged with each other, gone away, or just don't come to East Coast shows. One of the few exceptions is Lost Coast Designs, which has been around for a while.
One of my issues with Lost Coast and other stamp dealers from back in the day, is that they largely carried unmounted designs. One of the things I love about working with rubber stamps is that it's easy and immeidate. You ink your stamp, stamp it on paper, and pretty much, you're done. Unmounted stamps, especially those that are the rubber die only, are so much more work - or were. For years, if you bought just the rubber die, you had to mount it on foam, and then find a wood block to fit the image, and glue that down, and then, and only then can you use the stamp. Already I'm less interested. Over the years, folks came up with alternative methods, and I'll talk more about that in my next post, but suffice it to say, I never purchased many stamps from Lost Coast, even though I liked many of them, because they were unmounted. For unknown reasons, or perhaps because I can't resist Gibson Girl drawings, I gave in and bought three stamps/plates from Lost Coast at the Heirloom show.
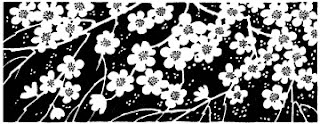
One of the last booths I visited at the Heirloom show was that of Technique Junkies. I'd heard of them, but never associated them with a line of rubber stamps, only with accessories and other stuff. As I walked around their booth, it turned out that not only did they have great stamps, they had a bunch I already had in my collection, as (I read later), they had taken over an older line from Stamp Camp. I bought a bunch of stamps from them: Cherry Blossoms, Daisies, Three Flower Collage, Draped Fabric, Love Fulfilled, and Umbrella People.
After the Heirloom show, my rubber stamp purchasing binge ended. For a while. I mentioned in an earlier post that in August I went to the Moon Rose in Huntington, NY. There I bought two stamps only - one each from Rosie's Roadshow and Magenta. The Paris quote attributed to Audrey Hepburn is, I think, a line from the original version of Sabrina. I have plans for both of these already, although when I looked, I could have sworn I had more than one Eiffel Tower stamp...
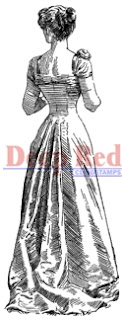
Somewhere along the way I learned about Deep Red Stamps. I generally don't like to buy stamps without having seen them in person, so I just made a long list of their images I was interested in and periodically looked at their website to add new things to my list. Suddenly, a few weeks ago, it became imperative to have one of their stamps right away (guess which one...). So I bought four: Gibson Girl, Composition Notebook, Victorian Evening Dress and Train Station.
At about the same time I was making my Deep Red order, by going down some rabbit hole or other, I learned of a stamp store in Washington State which sells stamps online, Scarlet Empress. I think they sell many lines in their retail shop, but only their own online. Their site is down just this moment, but one of the two stamps I bought is this one called Let's Do Lunch.
I still have a whole bunch of stamps on my shopping list and a few stores I might try to find when I'm in California in couple of weeks...
One more post in this series: Tools, etc.
The bulk of my stamp purchases were at the Heirloom show last spring. I mentioned in my previous post that I spent the most money and time at the Impression Obsession booth. They have a line of stamps called "Cover-a-Card" that I can't get enough of. These are mostly 6" x 6" squares that serve as background stamps. Because of their size, they will cover the entirety of most cards with one stamping (I use A2 - 5-1/2" x 4-1/4" most frequently). These are cling stamps which means you have to use IO's fancy rocking stamp mount thing, another really big acrylic block, or, like me, your big 6" x 12" quilting ruler. They have a million designs. I had about 3 of them prior to the show. I bought 6. There are about 30 more I want!
These are Greenery, Gradation, Sunburst, Fluff, Rain, and Spatter.


The style of rubber stamps and rubber stamping that really resonated with me when I first started was called "art stamping." By my definition, this was in contrast with cute, cartoon-ish stamps and well-suited to collage, faux postage, and other themes I gravitated towards. It seems like most of the companies that made art stamps have either merged with each other, gone away, or just don't come to East Coast shows. One of the few exceptions is Lost Coast Designs, which has been around for a while.
One of my issues with Lost Coast and other stamp dealers from back in the day, is that they largely carried unmounted designs. One of the things I love about working with rubber stamps is that it's easy and immeidate. You ink your stamp, stamp it on paper, and pretty much, you're done. Unmounted stamps, especially those that are the rubber die only, are so much more work - or were. For years, if you bought just the rubber die, you had to mount it on foam, and then find a wood block to fit the image, and glue that down, and then, and only then can you use the stamp. Already I'm less interested. Over the years, folks came up with alternative methods, and I'll talk more about that in my next post, but suffice it to say, I never purchased many stamps from Lost Coast, even though I liked many of them, because they were unmounted. For unknown reasons, or perhaps because I can't resist Gibson Girl drawings, I gave in and bought three stamps/plates from Lost Coast at the Heirloom show.
One of the last booths I visited at the Heirloom show was that of Technique Junkies. I'd heard of them, but never associated them with a line of rubber stamps, only with accessories and other stuff. As I walked around their booth, it turned out that not only did they have great stamps, they had a bunch I already had in my collection, as (I read later), they had taken over an older line from Stamp Camp. I bought a bunch of stamps from them: Cherry Blossoms, Daisies, Three Flower Collage, Draped Fabric, Love Fulfilled, and Umbrella People.
After the Heirloom show, my rubber stamp purchasing binge ended. For a while. I mentioned in an earlier post that in August I went to the Moon Rose in Huntington, NY. There I bought two stamps only - one each from Rosie's Roadshow and Magenta. The Paris quote attributed to Audrey Hepburn is, I think, a line from the original version of Sabrina. I have plans for both of these already, although when I looked, I could have sworn I had more than one Eiffel Tower stamp...
 |
Somewhere along the way I learned about Deep Red Stamps. I generally don't like to buy stamps without having seen them in person, so I just made a long list of their images I was interested in and periodically looked at their website to add new things to my list. Suddenly, a few weeks ago, it became imperative to have one of their stamps right away (guess which one...). So I bought four: Gibson Girl, Composition Notebook, Victorian Evening Dress and Train Station.
At about the same time I was making my Deep Red order, by going down some rabbit hole or other, I learned of a stamp store in Washington State which sells stamps online, Scarlet Empress. I think they sell many lines in their retail shop, but only their own online. Their site is down just this moment, but one of the two stamps I bought is this one called Let's Do Lunch.
I still have a whole bunch of stamps on my shopping list and a few stores I might try to find when I'm in California in couple of weeks...
One more post in this series: Tools, etc.
Subscribe to:
Posts (Atom)


